Note
Go to the end to download the full example code. or to run this example in your browser via Binder
Understanding NiftiMasker and mask computation
In this example, the NiftiMasker is used to automatically compute a mask.
The default strategy is based on the background.
Another option is to use a template.
For raw EPI, as in resting-state or movie watching time series, we need to use the ‘epi’ strategy of the NiftiMasker.
In addition, we show here how to tweak the different parameters of the
underlying routine that extract masks from EPI
compute_epi_mask.
Computing a mask from the background
The default strategy to compute a mask is to try to detect the background.
With data that has already been masked this should work well, as it relies on a homogeneous background
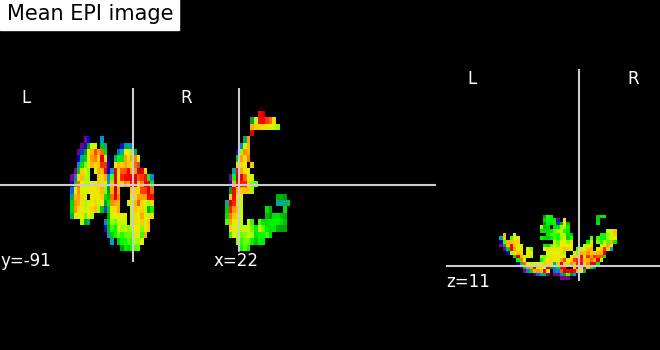
Fetch the dataset
We fetch do some basic visualization of the image we will be using.
from nilearn.datasets import fetch_miyawaki2008
from nilearn.image import mean_img
from nilearn.plotting import plot_epi, show

miyawaki_dataset = fetch_miyawaki2008()
print(
    "First functional nifti image (4D) is located "
    f"at: {miyawaki_dataset.func[0]}"
)

miyawaki_filename = miyawaki_dataset.func[0]
miyawaki_mean_img = mean_img(miyawaki_filename)

plot_epi(miyawaki_mean_img, title="Mean EPI image")

show()
[fetch_miyawaki2008] Dataset directory found:
/home/runner/work/nilearn/nilearn/nilearn_data/miyawaki2008
First functional nifti image (4D) is located at: /home/runner/work/nilearn/nilearn/nilearn_data/miyawaki2008/func/data_figure_run01.nii.gz
A NiftiMasker with the default strategy
Let’s use the NiftiMasker with its defaults parameters.
from nilearn.maskers import NiftiMasker

masker = NiftiMasker()
Note
When viewing an Nilearn estimator in a notebook (or more generally on an HTML page like here) you get an expandable ‘Parameters’ section where the parameters that have different values from their default are highlighted in orange. If you are using a version of scikit-learn >= 1.8.0 you will also get access to the ‘docstring’ description of each parameter.
Note
You can also note that after fitting, the HTML representation of the estimator looks different than before fitting.
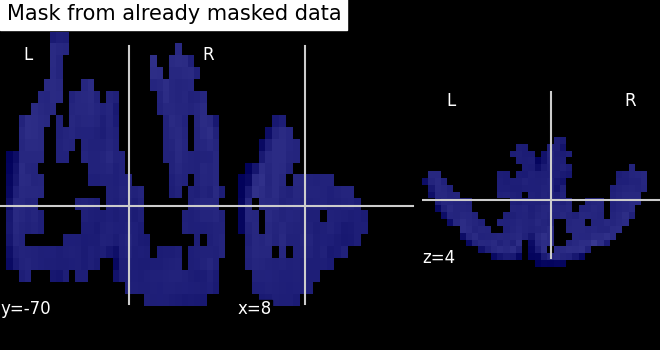
Visualize the mask
We can quickly get an idea about the estimated mask for this functional image by plotting the mask.
We get the estimated mask from the mask_img_ attribute of the masker:
the final _ of this attribute name means it was generated
by the fit method.
We can then plot it using the plot_roi function
with the mean functional image as background.
from nilearn.plotting import plot_roi

plot_roi(
    masker.mask_img_, miyawaki_mean_img, title="Mask from already masked data"
)

# display the image
show()
View the generated mask
More information can be obtained about the masker and its mask
by generating a masker report.
This can be done using
the generate_report method.
Note
The generated report can be:
displayed in a Notebook,
opened in a browser using the
.open_in_browser()method,or saved to a file using the
.save_as_html(output_filepath)method.
NiftiMasker
Applying a mask to extract time-series from Niimg-like objects.
NiftiMasker is useful when preprocessing (detrending, standardization,
resampling, etc.) of in-mask :term:`voxels` is necessary.
Use case:
working with time series of :term:`resting-state` or task maps.

This report shows the input Nifti image overlaid with the outlines of the mask. We recommend to inspect the report for the overlap between the mask and the input image.
The mask includes 5438 voxels (4.4 %) of the image.
| Value | |
|---|---|
| Parameter | |
| cmap | gray |
| detrend | False |
| high_variance_confounds | False |
| mask_strategy | background |
| memory_level | 1 |
| reports | True |
| standardize | False |
| standardize_confounds | True |
| verbose | 0 |
This report was generated based on information provided at instantiation and fit time. Note that the masker can potentially perform resampling at transform time.
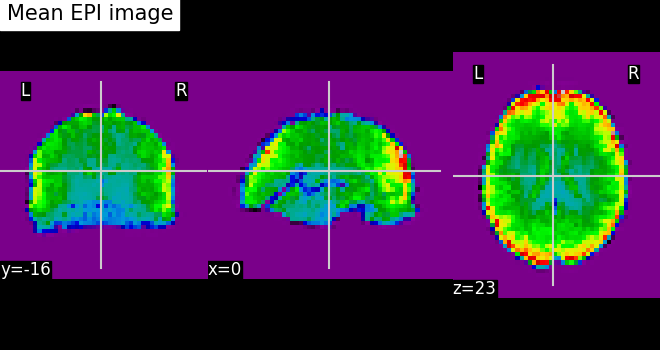
Computing a mask from raw EPI data
From raw EPI data, there is no uniform background, and a different strategy is necessary.
Fetch the dataset
Here we fetch the movie watching based brain development fMRI dataset and once again do some basic visualization of the data.
Here we only work with the first 100 volumes of the image to speed up computation.
from nilearn.datasets import fetch_development_fmri
from nilearn.image import index_img

dataset = fetch_development_fmri(n_subjects=1)
epi_filename = dataset.func[0]

epi_img = index_img(epi_filename, slice(0, 100))

mean_func_img = mean_img(epi_img)

plot_epi(mean_func_img, title="Mean EPI image")

show()
[fetch_development_fmri] Dataset directory found:
/home/runner/work/nilearn/nilearn/nilearn_data/development_fmri
[fetch_development_fmri] Dataset directory found:
/home/runner/work/nilearn/nilearn/nilearn_data/development_fmri/development_fmri
[fetch_development_fmri] Dataset directory found:
/home/runner/work/nilearn/nilearn/nilearn_data/development_fmri/development_fmri
Simple mask extraction from EPI images
We need to specify an 'epi' mask_strategy,
as this is raw EPI data
masker = NiftiMasker(mask_strategy="epi")
masker.fit(epi_img)
report = masker.generate_report()
report
NiftiMasker
Applying a mask to extract time-series from Niimg-like objects.
NiftiMasker is useful when preprocessing (detrending, standardization,
resampling, etc.) of in-mask :term:`voxels` is necessary.
Use case:
working with time series of :term:`resting-state` or task maps.

This report shows the input Nifti image overlaid with the outlines of the mask. We recommend to inspect the report for the overlap between the mask and the input image.
The mask includes 24428 voxels (16.6 %) of the image.
| Value | |
|---|---|
| Parameter | |
| cmap | gray |
| detrend | False |
| high_variance_confounds | False |
| mask_strategy | epi |
| memory_level | 1 |
| reports | True |
| standardize | False |
| standardize_confounds | True |
| verbose | 0 |
This report was generated based on information provided at instantiation and fit time. Note that the masker can potentially perform resampling at transform time.
Generate mask with strong opening
We can fine-tune the outline of the mask
by increasing the number of opening steps (opening=10)
using the mask_args argument of the NiftiMasker.
This effectively performs erosion
and dilation operations
on the outer voxel layers of the mask,
which can for example remove remaining skull parts in the image.
masker = NiftiMasker(mask_strategy="epi", mask_args={"opening": 10})
masker.fit(epi_img)
report = masker.generate_report()
report
NiftiMasker
Applying a mask to extract time-series from Niimg-like objects.
NiftiMasker is useful when preprocessing (detrending, standardization,
resampling, etc.) of in-mask :term:`voxels` is necessary.
Use case:
working with time series of :term:`resting-state` or task maps.

This report shows the input Nifti image overlaid with the outlines of the mask. We recommend to inspect the report for the overlap between the mask and the input image.
The mask includes 11617 voxels (7.9 %) of the image.
| Value | |
|---|---|
| Parameter | |
| cmap | gray |
| detrend | False |
| high_variance_confounds | False |
| mask_args | {'opening': 10} |
| mask_strategy | epi |
| memory_level | 1 |
| reports | True |
| standardize | False |
| standardize_confounds | True |
| verbose | 0 |
This report was generated based on information provided at instantiation and fit time. Note that the masker can potentially perform resampling at transform time.
Generate mask with a high lower cutoff
The NiftiMasker calls the nilearn.masking.compute_epi_mask function
to compute the mask from the EPI.
It has two important parameters: lower_cutoff and upper_cutoff.
These set the grey-value bounds
in which the masking algorithm will search for its threshold
(0 being the minimum of the image and 1 the maximum).
We will here increase the lower cutoff
to enforce selection of those voxels
that appear as bright in the EPI image.
masker = NiftiMasker(
    mask_strategy="epi",
    mask_args={"upper_cutoff": 0.9, "lower_cutoff": 0.8, "opening": False},
)
masker.fit(epi_img)
report = masker.generate_report()
report
NiftiMasker
Applying a mask to extract time-series from Niimg-like objects.
NiftiMasker is useful when preprocessing (detrending, standardization,
resampling, etc.) of in-mask :term:`voxels` is necessary.
Use case:
working with time series of :term:`resting-state` or task maps.

This report shows the input Nifti image overlaid with the outlines of the mask. We recommend to inspect the report for the overlap between the mask and the input image.
The mask includes 24809 voxels (16.8 %) of the image.
| Value | |
|---|---|
| Parameter | |
| cmap | gray |
| detrend | False |
| high_variance_confounds | False |
| mask_args | {'upper_cutoff': 0.9, 'lower_cutoff': 0.8, 'opening': False} |
| mask_strategy | epi |
| memory_level | 1 |
| reports | True |
| standardize | False |
| standardize_confounds | True |
| verbose | 0 |
This report was generated based on information provided at instantiation and fit time. Note that the masker can potentially perform resampling at transform time.
Computing the mask from the MNI template
A mask can also be computed from the MNI template.
In this case, it is resampled to the target image.
Three options are available:
'whole-brain-template', 'gm-template', and 'wm-template'
depending on whether the whole-brain, gray matter,
or white matter template should be used.
masker = NiftiMasker(mask_strategy="whole-brain-template")
masker.fit(epi_img)
report = masker.generate_report()
report
NiftiMasker
Applying a mask to extract time-series from Niimg-like objects.
NiftiMasker is useful when preprocessing (detrending, standardization,
resampling, etc.) of in-mask :term:`voxels` is necessary.
Use case:
working with time series of :term:`resting-state` or task maps.

This report shows the input Nifti image overlaid with the outlines of the mask. We recommend to inspect the report for the overlap between the mask and the input image.
The mask includes 21781 voxels (14.8 %) of the image.
| Value | |
|---|---|
| Parameter | |
| cmap | gray |
| detrend | False |
| high_variance_confounds | False |
| mask_strategy | whole-brain-template |
| memory_level | 1 |
| reports | True |
| standardize | False |
| standardize_confounds | True |
| verbose | 0 |
This report was generated based on information provided at instantiation and fit time. Note that the masker can potentially perform resampling at transform time.
Compute and resample a mask
NiftiMasker also allows passing parameters directly
to resample_img.
We can specify a target_affine, a target_shape, or both.
For more information on these arguments,
see Visualization of affine resamplings.
The NiftiMasker report allows us to see the mask before and after resampling. Simply hover over the report to see the mask from the original image.
import numpy as np

masker = NiftiMasker(mask_strategy="epi", target_affine=np.eye(3) * 8)
masker.fit(epi_img)
report = masker.generate_report()
report
NiftiMasker
Applying a mask to extract time-series from Niimg-like objects.
NiftiMasker is useful when preprocessing (detrending, standardization,
resampling, etc.) of in-mask :term:`voxels` is necessary.
Use case:
working with time series of :term:`resting-state` or task maps.


This report shows the input Nifti image overlaid with the outlines of the mask. We recommend to inspect the report for the overlap between the mask and the input image. To see the input Nifti image before resampling, hover over the displayed image.
The mask includes 3040 voxels (15.0 %) of the image.
| Value | |
|---|---|
| Parameter | |
| cmap | gray |
| detrend | False |
| high_variance_confounds | False |
| mask_strategy | epi |
| memory_level | 1 |
| reports | True |
| standardize | False |
| standardize_confounds | True |
| target_affine | [[8.0, 0.0, 0.0], [0.0, 8.0, 0.0], [0.0, 0.0, 8.0]] |
| verbose | 0 |
This report was generated based on information provided at instantiation and fit time. Note that the masker can potentially perform resampling at transform time.
After mask computation: extracting time series
We extract detrended and non-detrended time series.
trended_data = NiftiMasker(
    mask_strategy="epi", verbose=1, standardize="zscore_sample"
).fit_transform(epi_img)
detrended_data = NiftiMasker(
    mask_strategy="epi", detrend=True, verbose=1
).fit_transform(epi_img)
\[NiftiMasker.wrapped] Loading data from <nibabel.nifti1.Nifti1Image object at
0x7eff2ca6dba0>
\[NiftiMasker.wrapped] Computing mask
\[NiftiMasker.wrapped] Resampling mask
\[NiftiMasker.wrapped] Finished fit
\[NiftiMasker.wrapped] Loading data from <nibabel.nifti1.Nifti1Image object at
0x7eff2ca6dba0>
\[NiftiMasker.wrapped] Extracting region signals
\[NiftiMasker.wrapped] Cleaning extracted signals
\[NiftiMasker.wrapped] Loading data from <nibabel.nifti1.Nifti1Image object at
0x7eff2ca6dba0>
\[NiftiMasker.wrapped] Computing mask
\[NiftiMasker.wrapped] Resampling mask
\[NiftiMasker.wrapped] Finished fit
/home/runner/work/nilearn/nilearn/examples/06_manipulating_images/plot_mask_computation.py:247: FutureWarning:

boolean values for 'standardize' will be deprecated in nilearn 0.15.0.
Use 'zscore_sample' instead of 'True' or use 'None' instead of 'False'.

\[NiftiMasker.wrapped] Loading data from <nibabel.nifti1.Nifti1Image object at
0x7eff2ca6dba0>
\[NiftiMasker.wrapped] Extracting region signals
\[NiftiMasker.wrapped] Cleaning extracted signals
Once extracted, the timeseries are numpy arrays, so we can use numpy operations on them.
print(
    f"Trended:\tmean {np.mean(trended_data):.2f},\t"
    f"std {np.std(trended_data):.2f}"
)
print(
    f"Detrended:\tmean {np.mean(detrended_data):.2f},\t"
    f"std {np.std(detrended_data):.2f}"
)
Trended:        mean -0.00,     std 0.99
Detrended:      mean -0.00,     std 5.88
Total running time of the script: (0 minutes 9.446 seconds)
Estimated memory usage: 323 MB